Spring 简介
Spring 概述
Spring 框架的核心特性就是可以用于开发任何Java程序,但是在JEE平台上构建web应用长须是需要扩展的。
Spring 家族
https://spring.io/projects
Spring Framework
所有的Spring框架均是建立在Spring Framework 的基础上的。
特性
- 非侵入式:对原生技术 和 领域模型是零污染。
- 控制反转IOC:反转资源获取方向,将自己创建资源、向环境索取资源 → 环境将资源准备好、我们享受资源注入(降低对象与对象的依赖关系)。
- 面向切面AOP:在不修改源代码的基础上,将容器内对象替换成代理类,再完成注入 → 增强代码功能。
- 容器:SpringIOC是一个容器,因为它包含并且管理组件的生命周期。组件享受到了容器化的管理,替程序员屏蔽了组件创建过程中的大量细节,极大降低了使用门槛。
- 声明式:很多以前需要编写代码才能实现的功能,现在只需要声明需求即可由框架代为实现的。
- 组件化:组件即放在容器当中bean,并且使用注入完整组件的组装。
- 一站式:在IOC和AOP的基础上可以整合各种企业应用的开源框架和优秀的地方库。而且Spring家族系列已经覆盖了广泛的领域,很多方面的功能性需求可以在Spring Framework 的基础上全部使用Spring 来实现
五大功能模块 (仅仅是Spring Framework)
|
|
| 功能模块 |
功能介绍 |
| Core Container |
核心容器、在Spring环境下使用任何功能都必须基于IOC容器。 |
| AOP & Aspects |
面向切面编程 |
| Testing |
提供了对Junit 或 TestNG 测试框架的整合 |
| Data Access / Integration |
提供了对数据访问/集成的功能 (SpringJDBC) |
| Spring MVC |
提供了面向Web应用程序的集成功能 |
IOC(最重要!!!)
IOC思想
以前:使用什么资源需要自行创建,创建的细节也需要自己了解。 现在:现在需要使用什么资源,声明一下即可,IOC会自动向声明位置注入资源。(容器推送资源给需要的组件,整合包里面会自动提供资源的创建方式,程序员不用在处理了。)
DI:依赖注入、是IOC的另一种表述方式、是IOC的具体实现,比如 setter方式接受容器资源的注入。
IOC在Spring中的实现
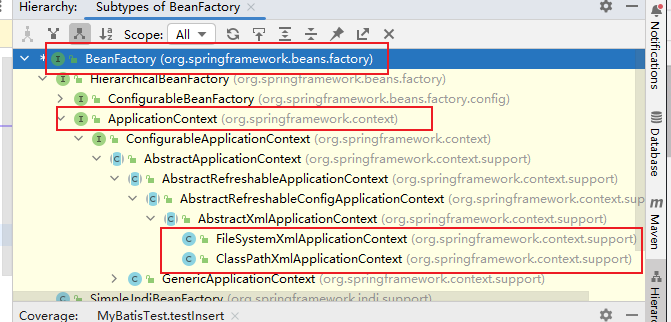
方式一:BeanFactory ,IOC容器的基本实现,是Spring内部使用的接口。面向Spring本身,不提供给开发人员使用。
方式二:ApplicationContext,BeanFactory的子接口,提供了更多高级的特性。面向Spring的使用者的,几乎所有场合都使用ApplicationContext,而不是底层的BeanFactory。
子类 ClassPathXmlApplicationContext 使用的是最多的。
基于XML管理Bean(重要)
依然很重要,因为可能第三方类库没有Spring整合包,也就是我们自己注入类库组件,注解方式是行不通,因此只能使用XML的方式。
创建项目
导入项目依赖
1
2
3
4
5
6
7
8
9
10
11
12
13
14
15
16
17
18
19
20
21
22
23
24
25
26
27
28
29
| <?xml version="1.0" encoding="UTF-8"?>
<project xmlns="http://maven.apache.org/POM/4.0.0"
xmlns:xsi="http://www.w3.org/2001/XMLSchema-instance"
xsi:schemaLocation="http://maven.apache.org/POM/4.0.0 http://maven.apache.org/xsd/maven-4.0.0.xsd">
<parent>
<artifactId>MybatisDemo</artifactId>
<groupId>com.atguigu.mybatis</groupId>
<version>1.0-SNAPSHOT</version>
</parent>
<modelVersion>4.0.0</modelVersion>
<groupId>com.atguigu.spring</groupId>
<artifactId>spring_helloworld</artifactId>
<properties>
<maven.compiler.source>19</maven.compiler.source>
<maven.compiler.target>19</maven.compiler.target>
<project.build.sourceEncoding>UTF-8</project.build.sourceEncoding>
</properties>
<dependencies>
<dependency>
<groupId>org.springframework</groupId>
<artifactId>spring-context</artifactId>
<version>5.3.23</version>
</dependency>
</dependencies>
</project>
|
创建Spring配置文件,将需要注入的bean配置到里面
位置:src/main/resources/applicationContext.xml
1
2
3
4
5
6
7
8
9
10
11
12
| <?xml version="1.0" encoding="UTF-8" ?>
<beans xmlns="http://www.springframework.org/schema/beans"
xmlns:xsi="http://www.w3.org/2001/XMLSchema-instance"
xsi:schemaLocation="
http://www.springframework.org/schema/beans http://www.springframework.org/schema/beans/spring-beans-4.0.xsd">
<bean id="helloworld" class="com.atguigu.spring.pojo.HelloWorld"></bean>
</beans>
|
可以在test文件中
1
2
3
4
5
6
7
8
9
10
11
12
13
14
15
| import com.atguigu.spring.pojo.HelloWorld;
import org.junit.Test;
import org.springframework.context.support.ClassPathXmlApplicationContext;
public class HelloWorldTest {
@Test
public void test(){
ClassPathXmlApplicationContext ioc = new ClassPathXmlApplicationContext("applicationContext.xml");
HelloWorld helloworld = (HelloWorld) ioc.getBean("helloworld");
helloworld.sayHello();
}
}
|
Bean的
注册
<bean>
一般的 bean 使用 标签注册即可,看上方搭建项目里面即可
<util:list>
注册 集合类型的 bean
1
2
3
4
5
|
<util:list id="studentList" >
<ref bean="studentOne"></ref>
<ref bean="studentTwo"></ref>
</util:list>
|
获取Bean的三种方式
根据 id,类型,id + 类型获取的三种方式
根据类型获取注意点:当容器当中有多个相同类型的Bean的时候就GG了。 → NoUniqueBeanDefinitionException ( 这个最常用,就用这个 )
id + 类型的方式:id 和 类型组合起来唯一就行啦。
‼️ 组件实现了接口,同样可以使用接口的类型获得组件,但前提是Bean唯一。
1
2
3
|
Person person = ioc.getBean(Person.class);
|
依赖注入详解
首先简单介绍分两类,其次介绍各种类型数据如何注入。
类似于java中的setter和getter方法,给类的属性赋值
setter 注入(用的最多)
setter 注入 和 set方法有关,跟成员变量没有关系。使用property方法
理解:对com.atguigu.spring.pojo.Student类的sname属性赋值为“张三”
1
2
3
4
| <bean id="studentOne" class="com.atguigu.spring.pojo.Student">
<property name="sname" value="张三"></property>
</bean>
|
构造器注入(与对象的构造器类似)
根据 标签的顺序来决定调用那个构造参数,name 属性不要省(虽然可以省)
1
2
3
4
5
6
7
|
<bean id="studentTwo" class="com.atguigu.spring.pojo.Student">
<constructor-arg name="sid" value="1"></constructor-arg>
<constructor-arg name="sname" value="张三"></constructor-arg>
<constructor-arg name="age" value="20"></constructor-arg>
<constructor-arg name="gender" value="男"></constructor-arg>
</bean>
|
各种类型如何注入
字面量注入
字面量包含 基本数据类型、String、包装类型
String 赋值 null
1
2
3
| <property name="sname">
<null></null>
</property>
|
特殊字符,可以使用转义,或 CDATA区
1
2
3
| <property name="sname">
<value><![CDATA[ a>b ]]</value>
</property>
|
为类/接口类型的属性复制
ref方式:如下:Student类含有一个Course成员,且提供了setter.
1
2
3
4
5
6
7
8
| <bean id="courseOne" class="com.atguigu.spring.pojo.Course">
</bean>
<bean id="studentOne" class="com.atguigu.spring.pojo.Student">
<property name="course" ref="courseOne"></property>
</bean>
|
内部bean的方式:但是IOC不能获取到内部Bean了。
1
2
3
4
5
6
7
8
9
| <bean id="studentOne" class="com.atguigu.spring.pojo.Student">
<property name="course">
<bean id="courseOne" class="com.atguigu.spring.pojo.Course">
<property name="cid" value="2222"></property>
<property name="cname" value="远大前程班"></property>
</bean>
</property>
</bean>
|
数组
如果是字面量类型则用 value,如果是类类型则用 ref
1
2
3
4
5
6
7
8
9
10
11
12
13
| <bean id="studentOne" class="com.atguigu.spring.pojo.Student">
<property name="hobby">
<array>
<value>抽烟</value>
<value>喝酒</value>
<value>烫头</value>
</array>
</property>
</bean>
|
List集合(两种方式)
方式一:Property标签内部设置,字面量类型用 value,类类型用 ref
1
2
3
4
5
6
7
8
9
10
| <bean id="course" class="com.atguigu.spring.pojo.Course">
<property name="students">
<list>
<ref bean="studentOne"></ref>
<ref bean="studentTwo"></ref>
<ref bean="studentThree"></ref>
</list>
</property>
</bean>
|
方式二:或者从List类型的bean 注入
1
2
3
4
5
6
7
8
9
10
| <bean id="course" class="com.atguigu.spring.pojo.Course">
<property name="students" ref="studentList"></property>
</bean>
<util:list id="studentList" >
<ref bean="studentOne"></ref>
<ref bean="studentTwo"></ref>
</util:list>
|
Map 集合(两种方式)
方式一:Property标签内部设置
键是字面量类型则用 key 属性,类类型则用 key-ref
1
2
3
4
5
6
7
8
9
10
11
12
| <bean id="teacherOne" class="com.atguigu.spring.pojo.Teacher"></bean>
<bean id="teacherTwo" class="com.atguigu.spring.pojo.Teacher"></bean>
<bean id="studentOne" class="com.atguigu.spring.pojo.Student">
<property name="teacherMap">
<map>
<entry key="teacherOne" value-ref="teacherOne"></entry>
<entry key="teacherTwo" value-ref="teacherTwo"></entry>
</map>
</property>
</bean>
|
方式二:或者从Map类型的bean 注入
1
2
3
4
5
6
7
8
9
10
| <util:map id="teacherMap">
<entry key="teacherOne" value-ref="TeacherOne"></entry>
<entry key="teacherTwo" value-ref="teacherTwo"></entry>
</util:map>
<bean id="studentOne" class="com.atguigu.spring.pojo.Student">
<property name="teacherMap" ref="teacherMap"></property>
</bean>
|
Xml Druid数据源
如连接mybatis、sql等都是需要导入依赖的,mysql相关依赖如下:
1
2
3
4
5
6
7
8
9
10
11
|
<dependency>
<groupId>mysql</groupId>
<artifactId>mysql-connector-java</artifactId>
<version>8.0.30</version>
</dependency>
<dependency>
<groupId>com.alibaba</groupId>
<artifactId>druid</artifactId>
<version>1.2.14</version>
</dependency>
|
基本方法
基本连接mysql方法的配置文件编写如下spring-datasource.xml:
1
2
3
4
5
6
7
8
9
10
11
12
| <?xml version="1.0" encoding="UTF-8"?>
<beans xmlns="http://www.springframework.org/schema/beans"
xmlns:xsi="http://www.w3.org/2001/XMLSchema-instance"
xsi:schemaLocation="http://www.springframework.org/schema/beans http://www.springframework.org/schema/beans/spring-beans.xsd">
<bean id="datasource" class="com.alibaba.druid.pool.DruidDataSource">
<property name="driverClassLoader" value="com.mysql.jdbc.Driver"></property>
<property name="url" value="jdbc:mysql://localhost:3307/ssm?serverTimezone=UTC"></property>
<property name="username" value="root"></property>
<property name="password" value="19842100"></property>
</bean>
</beans>
|
可以编写测试函数,本地连接数据库成功
1
2
3
4
5
6
7
8
9
10
11
12
13
14
15
16
| package com.atguigu.test;
import com.alibaba.druid.pool.DruidDataSource;
import org.junit.Test;
import org.springframework.context.ApplicationContext;
import org.springframework.context.support.ClassPathXmlApplicationContext;
import java.sql.SQLException;
public class DataSourceTest {
@Test
public void testDataSource() throws SQLException{
ApplicationContext ioc = new ClassPathXmlApplicationContext("spring-datasource.xml");
DruidDataSource dataSource = ioc.getBean(DruidDataSource.class);
System.out.println(dataSource.getConnection());
}
}
|
配置方法
编写jdbc.properties文件
1
2
3
4
| jdbc.url=jdbc:mysql://localhost:3307/ssm?serverTimezone=UTC
jdbc.driver=com.mysql.cj.jdbc.Driver
jdbc.user=root
jdbc.password=19842100
|
然后再引入jdbc.properties文件
1
2
3
4
5
6
7
8
9
10
11
12
13
14
15
16
17
18
19
20
21
22
23
24
25
26
27
28
29
30
| <?xml version="1.0" encoding="UTF-8" ?>
<beans xmlns="http://www.springframework.org/schema/beans"
xmlns:xsi="http://www.w3.org/2001/XMLSchema-instance"
xmlns:util="http://www.springframework.org/schema/util"
xmlns:context="http://www.springframework.org/schema/context"
xsi:schemaLocation="http://www.springframework.org/schema/beans
http://www.springframework.org/schema/beans/spring-beans-4.0.xsd
http://www.springframework.org/schema/util
https://www.springframework.org/schema/util/spring-util.xsd
http://www.springframework.org/schema/context
http://www.springframework.org/schema/context/spring-context.xsd">
<context:property-placeholder location="jdbc.properties"></context:property-placeholder>
<bean id="dataSource" class="com.alibaba.druid.pool.DruidDataSource">
<property name="driverClassName" value="${jdbc.driver}"></property>
<property name="url" value="${jdbc.url}"></property>
<property name="username" value="${jdbc.user}"></property>
<property name="password" value="${jdbc.password}"></property>
<property name="initialSize" value="10"></property>
<property name="maxActive" value="16"></property>
</bean>
</beans>
|
bean的作用域Scope
|
|
|
| 取值 |
含义 |
创建对象时机 |
| singleton(默认) |
在IOC容器中,这个bean的对象始终为单例 |
容器初始化的时候创建 |
| prototype |
原型模式,获取创建的都是新的对象 |
从容器当中获取的时候创建 |
如果是WebApplicationContext环境下(Web应用),还有另外两个作用域(但不常用)
|
|
| 取值 |
含义 |
| request |
在一个请求范围内有效 |
| prototype |
在一个会话范围内有效 |
bean的生命周期(重要)

前/后置处理器(简单了解)
生命周期 调用 初始化方法的前后 加入额外的处理代码 ‼️ 容器只能配置一个后置处理器, 针对所有的Bean进行处理。
1
2
3
4
5
6
7
8
9
10
11
12
13
14
15
16
17
18
19
20
| public class MyBeanPostProcessor implements BeanPostProcessor {
@Override
public Object postProcessBeforeInitialization(Object bean, String beanName) throws BeansException {
System.out.println("初始化之前调用 --> postProcessBeforeInitialization");
return bean;
}
@Override
public Object postProcessAfterInitialization(Object bean, String beanName) throws BeansException {
System.out.println("初始化之后调用 --> postProcessAfterInitialization");
return bean;
}
}
<bean id="user" class="com.atguigu.spring.pojo.User" init-method="initMethod" destroy-method="destroyMethod">
<!-- setter 依赖注入 -->
<property name="username" value="张三"></property>
</bean>
<!-- 后置处理器配置 -->
<bean id="myBeanPostProcessor" class="com.atguigu.spring.processor.MyBeanPostProcessor"></bean>
|
作用域对生命周期的影响
Singleton : 容器创建后立马的执行123, 后续获取直接从4开始,容器关闭调用5 prototype:从容器中获取bean则1, 2, 3, 4 执行,容器关闭不会执行5 , 此作用域对象销毁方法需要用户自己处理。
FactoryBean (了解/会用)
将工厂作为Bean配置到IOC容器当中去,进而可以直接使用IOC容器获得Bean,而不是先获得 Factory. ‼️ 真正交给IOC管理的对象是其从Factory当中返回的bean对象. ‼️ 也就是说 Bean 的创建交给了 FactoryBean ,而FactoryBean 则交给了IOC创建.
好处:Bean的创建很复杂,使用XML完成创建很麻烦
FactoryBean
1
2
3
4
5
6
7
8
9
10
11
| public class UserFactoryBean implements FactoryBean<User> {
@Override
public User getObject() throws Exception {
return new User();
}
@Override
public Class<?> getObjectType() {
return User.class;
}
}
|
配置
1
| <bean class="com.atguigu.spring.factory.UserFactoryBean"></bean>
|
测试
1
2
3
4
5
6
| @Test
public void test(){
ApplicationContext ioc = new ClassPathXmlApplicationContext("spring-factoryBean.xml");
User user = ioc.getBean(User.class);
System.out.println(user);
}
|
基于XML的自动装配(重要)
注入类类型(字面量的不行)的时候,XML文件中不在写Property标签和 ref 属性完成注入。
下方演示的将 Service使用自动装配的方式注入到 Controller 中
1
2
3
4
5
6
7
8
9
10
11
12
13
14
15
16
17
| public class UserController {
UserService userService;
public UserService getUserService() {
return userService;
}
public void setUserService(UserService userService) {
this.userService = userService;
}
}
<bean id="controller" class="com.atguigu.spring.controller.UserController" autowire="byType"></bean>
<bean id="userService" class="com.atguigu.spring.service.impl.UserServiceImpl">
<!-- ... -->
</bean>
|
上方演示的是beType (用的最多) 方式,其会去容器当中找 UserService 的实现类,
a) 如果找不到则不装配.
b) 如果找到多个会报 noUniqueBeanDefinitionException。
byName 基本用不到,我们不用管啦,因为在开发中一个类型的组件只会向容器当中放一次. 当容器当中有多个相同类型能匹配到的时候,可以使用byName进行区分。
基于注解管理bean(重要)
注册Bean 的注解(四个)
四个注解及其关系
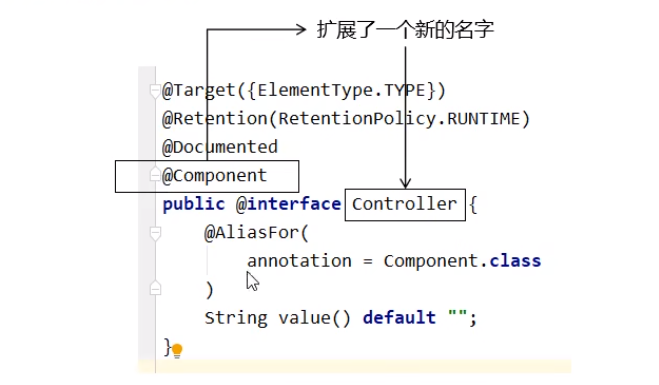
@Component : 将类标识为普通组件
@Controller:将类标识为控制层组件
@Service:将类标识为业务层组件
@Repository: 将类标识为持久层组件
‼️ 这四个注解功能一摸一样 , 只是给开发人员看(代码可读性),让开发人员区分组件的功能。
四个注解之间的关系 :均有 @Component 扩展出来
id
id不写的时候默认是小驼峰,比如 UserController 加上 @Controller 注解以后,其在容器的id就是 userController。
自定义id:@Controller("userController")
扫描组件
1
2
|
<context:component-scan base-package="com.atguigu.spring"></context:component-scan>
|
排除扫描:排除对某些包下的组件的扫描
1
2
3
4
5
6
7
8
9
10
|
<context:component-scan base-package="com.atguigu.spring">
<context:exclude-filter type="annotation" expression="org.springframework.stereotype.Controller"/>
</context:component-scan>
|
包含扫描:只对某些包下的某些组件的扫描
use-default-filters="ture" :表示包下的所有的类都需要扫描,需要关掉(false)才能使用包含扫描
1
2
3
4
5
6
7
8
9
10
|
<context:component-scan base-package="com.atguigu.spring" use-default-filters="false">
<context:include-filter type="annotation" expression="org.springframework.stereotype.Controller"/>
</context:component-scan>
|
自动装配注解
Autowire、Qualifier
放置位置
放在成员变量上:则Spring会使用暴力反射的方式完成私有属性输入
1
2
3
4
5
| @Controller
public class UserController {
@Autowired
private UserService service;
}
|
放在 setter 方法上:
1
2
3
4
5
6
7
8
9
| @Controller
public class UserController {
private UserService service;
@Autowired
public void setService(UserService service) {
this.service = service;
}
}
|
放在有参构造上:代码就不演示了,使用第一种即可啦。
@Autowire 注解的原理
a ) 默认通过 byType 的方式,在IOC容器中通过类型匹配某个bean为属性赋值。 b) 当有多个 bean 的类型能匹配到,其会转换为 byName 的方式,其 匹配名称为属性名。 c) 当有多个 bean 的类型能匹配到,但未找到id相同的,则报 noUniqueBeanDefinationException.
@ Qualifier 注解原理
当发生 @Autowire 的 c) 的情况的收,可以自己指定bean的id
1
2
3
4
5
6
7
| @Controller
public class UserController {
@Autowired
@Qualifier("userService")
private UserService service;
}
|
NoSuchBeanDefinationException
当匹配不到Bean完成自动装配的时候,会报 NoSuchBeanDefinationException 的错误。当 修改 为 @Autowire(required = false) 的时候,找不到Bean完成自动装配则使用默认值,和使用XML自动装配的时候的情况一样。
AOP
代理
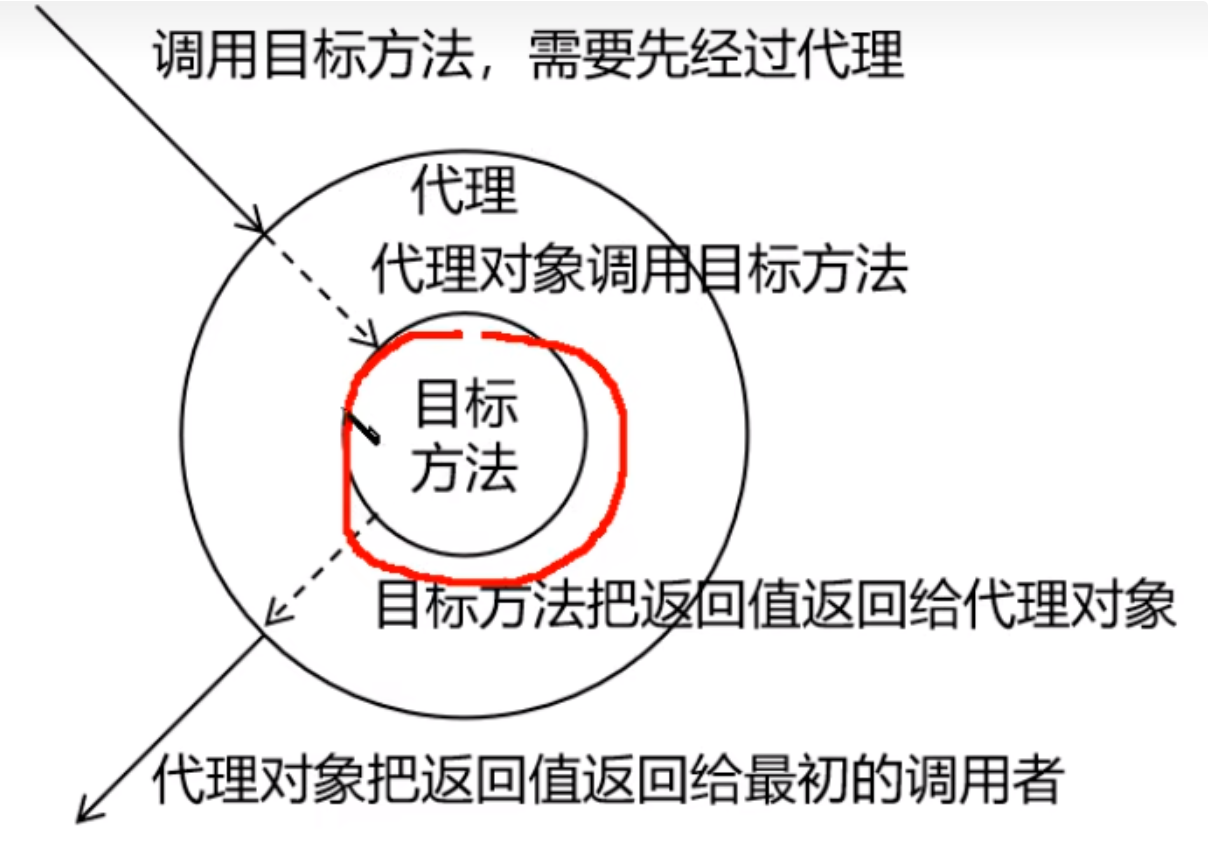
代理:将非核心逻辑剥离出来以后,封装这些非核心逻辑的类、对象、方法。 目标:被代理”套用”了非核心逻辑的类、对象、方法。
动态代理(重点:JDK和cglib区别)
不用自己创建代理类 java 文件(静态代理),而是使用java 提供的API生成任意目标类的代理类。
优点:1. 不用创建过多代理类文件。 2. 静态代理实现的接口的每个方法都需要手动添加增强代码,而动态代理只用添加一次。
1
2
3
4
5
6
7
8
9
10
11
12
13
14
15
16
17
18
19
20
21
22
23
24
25
26
27
28
29
30
31
32
33
34
35
|
public class ProxyFactory {
private static class Handler implements InvocationHandler{
private Object target;
public Handler(Object proxyedObject) {
target = proxyedObject;
}
@Override
public Object invoke(Object proxy, Method method, Object[] args) throws Throwable {
try{
Object result = method.invoke(target, args);
} catch(Exception e) {
e.printStackTrace();
} finally {
}
return result;
}
}
public static Object getProxy(final Object target) {
return Proxy.newProxyInstance(target.getClass().getClassLoader(), target.getClass().getInterfaces(), new Handler(target));
}
}
|
AOP
概述:是一种思想, 面向切面编程, 是面向对象编程的一种补充和完善 , 它以通过预编译的方式和运行期动态代理的方式实现在不修改源代码的情况下给程序动态统一添加额外功能的一种技术.
相关术语 ( 重点理解 )
横切关注点 : 被代理类抽取的非核心业务代码;
通知 :每个 横切关注点 都需要对应一个方法实现, 这样的切面类方法就叫通知方法.
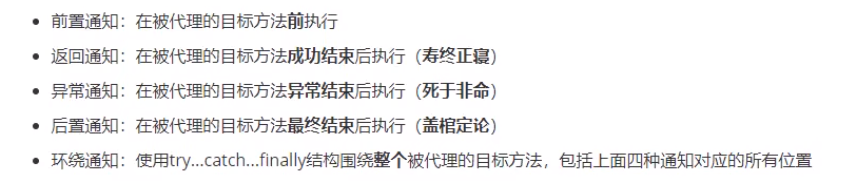
‼️ 后置通知 和 返回 通知的区别 : 前者是 try { } 内部方法调用成功返回后 , 而后置通知是 finally { } 里面的代码.
切面 ( 最重要 ):封装横切关注点的类 , 就叫切面 或 封装通知方法类就叫切面.
目标 : 被代理的目标对象.
代理 : 向目标对象应用通知之后创建的代理对象. ( 不需要我们自己创建, 而是 AOP 帮我们创建 )
连接点 (逻辑概念): 横切关注点 被 抽取的位置.
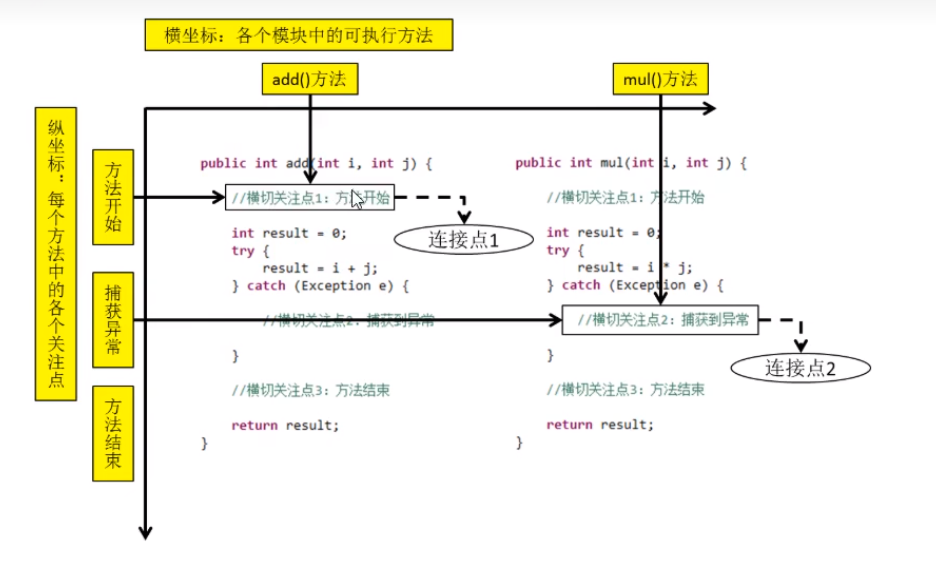
切入点 : 本质就是个表达式 , 起到定位链接点的作用 , 将 表达式 注解到 通知上面 , 进而作用到表示的连接点上面.
‼️ 总结 : AOP 重点编写切面类 ( 先抽取代码 ),通过切点表达式声明的方式 ( 再套到目标类上 )告诉Spring框架我要将我注解到的通知应用到那个类的那个连接点上。
AOP的作用
简化代码 : 具有重复性( 多个类的相同位置 )的非核心业务代码抽取 , 让目标类当中仅剩下简洁的核心业务代码.
代码增强 : 需要切面类里面功能, 直接套上去就增强目标类的代码了.
基于注解实现AOP (重点)
A. 技术说明
JDK 动态代理 和 cglib 的区别在 5.2 中已经给出说明.
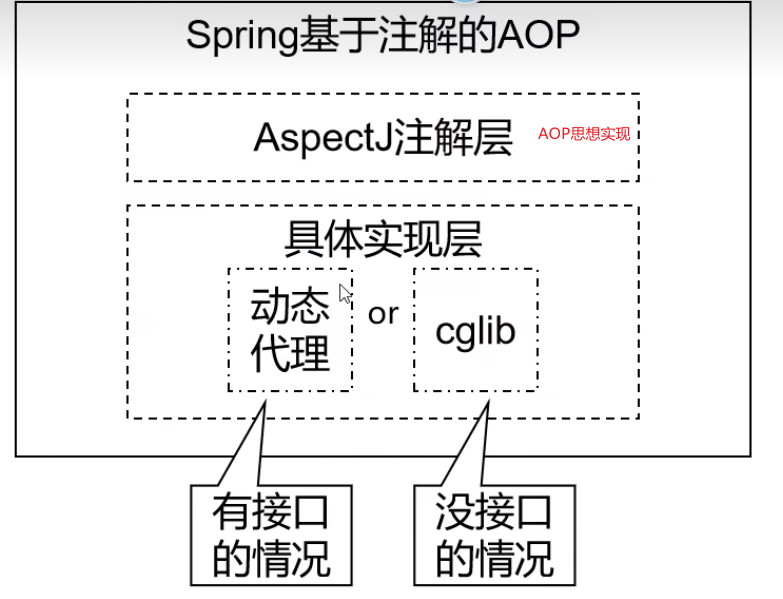
AspectJ : 本质上是静态代理, 将代理逻辑”织入” 被代理的目标类编译得到的字节码文件, 所以最终效果是动态. weaver 就是织入器. Spring 只是借用了 AspectJ 中的注解.
B. 添加依赖
‼️ 在IOC 所需依赖 ( spring-context ) 基础上再加入下面依赖即可:
1
2
3
4
5
| <dependency>
<groupId>org.springframework</groupId>
<artifactId>spring-aspects</artifactId>
<version>5.3.1</version>
</dependency>
|
C. 创建切面类并配置(**)
实现个日志的切面类 .
- 切面类 和 目标类都要注册到 容器 → @Component 组件修饰.
- 切面类必须通过 @Aspect 注解标识为一个切面
- 在Spring的配置文件中开启aop 注解功能
<aop:aspectj-autoproxy/>
1
2
3
4
5
6
7
8
9
10
11
12
13
14
15
16
17
18
19
20
21
22
23
24
25
26
27
28
29
30
31
32
33
34
35
36
37
|
@Component
@Aspect
public class LoggerAspect {
@Before("execution(* com.atguigu.spring.aop.anno.Calculator.*(..))")
public void beforeAdviceMethod(JoinPoint joinPoint) {
System.out.println("前置方法通知");
}
}
<?xml version="1.0" encoding="UTF-8" ?>
<beans xmlns="http://www.springframework.org/schema/beans"
xmlns:xsi="http://www.w3.org/2001/XMLSchema-instance"
xmlns:util="http://www.springframework.org/schema/util"
xmlns:context="http://www.springframework.org/schema/context"
xmlns:aop="http://www.springframework.org/schema/aop"
xsi:schemaLocation="http://www.springframework.org/schema/beans
http://www.springframework.org/schema/beans/spring-beans-4.0.xsd
http://www.springframework.org/schema/util
https://www.springframework.org/schema/util/spring-util.xsd
http://www.springframework.org/schema/context
http://www.springframework.org/schema/context/spring-context.xsd http://www.springframework.org/schema/aop https://www.springframework.org/schema/aop/spring-aop.xsd">
<!--
AOP 切面类 和 目标类都需要交给 IOC 容器管理
-->
<context:component-scan base-package="com.atguigu.spring.aop"></context:component-scan>
<!-- 开启基于注解的AOP功能 -->
<aop:aspectj-autoproxy/>
</beans>
|
D. 获取链接点的方法信息
添加JoinPoint 参数即可
1
2
3
4
5
6
7
8
9
10
11
12
13
14
15
16
17
| @Component
@Aspect
public class LoggerAspect {
@Before("execution(* com.atguigu.spring.aop.anno.Calculator.*(..))")
public void beforeAdviceMethod(JoinPoint joinPoint) {
System.out.println(joinPoint.getSignature().getName());
Object[] args = joinPoint.getArgs();
for (int i = 0; i < args.length; i++) {
System.out.println(args[i]);
}
}
}
|
E.切入点表达式的重用
创建一个没有任何作用的方法, 用来放置公共的切断点表达式.
1
2
3
4
5
6
7
8
9
10
11
12
13
14
15
16
17
| @Component
@Aspect
public class LoggerAspect {
@Pointcut("execution(* com.atguigu.spring.aop.anno.Calculator.*(..))")
public void pointCut() {}
@Before("pointCut()")
public void beforeAdviceMethod(JoinPoint joinPoint) {
System.out.println("前置通知");
}
@AfterReturning("pointCut()")
public void afterAdviceMethod(JoinPoint joinPoint) {
System.out.println("返回通知");
}
}
|
F. 返回通知获得返回值
1
2
3
4
| @AfterReturning(value = "pointCut()", returning = "result")
public void afterAdviceMethod(JoinPoint joinPoint, Object result) {
System.out.println("返回通知, 且返回值为 : " + result);
}
|
G. 异常通知获取异常
1
2
3
4
| @AfterThrowing(value = "pointCut()", throwing = "ex")
public void afterThrowingAdviceMethod(JoinPoint joinPoint, Exception ex) {
System.out.println("发生异常" + ex);
}
|
H. 环绕通知
相当于手动实现动态代理,能代替前面四种通知,且能与前面4种通知共存。一般设置了前面的通知后,就没必要设置环绕通知啦。
1
2
3
4
5
6
7
8
9
10
11
12
13
14
15
16
17
|
@Around("pointCut()")
public void aroundAdviceMethod(ProceedingJoinPoint proceedingJoinPoint) {
try {
System.out.println("环绕通知 --> 前置通知");
Object proceed = proceedingJoinPoint.proceed();
System.out.println("环绕通知 --> 返回通知");
} catch (Throwable e) {
System.out.println("环绕通知 --> 异常通知");
throw new RuntimeException(e);
} finally {
System.out.println("环绕通知 --> 后置通知");
}
}
|
I. 各种通知的执行顺序
Spring 5.3.x 版本以前
前置通知 → 目标操作 → 后置通知 → 返回通知/异常通知
Spring 5.3.x 版本以后 ( 当前笔记所作的版本 )
前置通知 → 目标操作 → 返回通知 / 异常通知 → 后置通知
J.切面优先级
只需要使用注解 @Order 在切面类的注解上即可,数值越小优先级越高。且默认值是 INT_MAX
1
2
3
4
5
6
7
8
9
10
11
12
13
14
15
16
17
18
| @Component
@Aspect
@Order(1)
public class LoggerAspect {
@Pointcut("execution(* com.atguigu.spring.aop.anno.Calculator.*(..))")
public void pointCut() {}
@Before("pointCut()")
public void beforeAdviceMethod(JoinPoint joinPoint) {
System.out.println("前置通知");
}
@AfterReturning("pointCut()")
public void afterAdviceMethod(JoinPoint joinPoint) {
System.out.println("返回通知");
}
}
|
JDBCTemplate(了解)
是什么:Spring 对 JDBC 进行封装,使用JdbcTemplate 方便实现数据库操作.
A.依赖:
1
2
3
4
5
6
7
8
9
10
11
12
13
14
15
16
17
18
19
20
21
22
23
24
25
26
27
28
29
30
31
32
|
<dependency>
<groupId>org.springframework</groupId>
<artifactId>spring-context</artifactId>
<version>5.3.23</version>
</dependency>
<dependency>
<groupId>mysql</groupId>
<artifactId>mysql-connector-java</artifactId>
<version>8.0.30</version>
</dependency>
<dependency>
<groupId>com.alibaba</groupId>
<artifactId>druid</artifactId>
<version>1.2.15</version>
</dependency>
<dependency>
<groupId>org.springframework</groupId>
<artifactId>spring-orm</artifactId>
<version>5.3.23</version>
</dependency>
<dependency>
<groupId>org.springframework</groupId>
<artifactId>spring-test</artifactId>
<version>5.3.23</version>
</dependency>
|
B. 注册JdbcTemplate
druid 数据源配置可以看上方的 笔记
1
2
3
4
5
6
7
8
9
10
11
12
13
14
15
16
17
18
19
20
21
22
23
|
<context:property-placeholder location="jdbc.properties"></context:property-placeholder>
<bean id="dataSource" class="com.alibaba.druid.pool.DruidDataSource">
<property name="driverClassName" value="${jdbc.driver}"></property>
<property name="url" value="${jdbc.url}"></property>
<property name="username" value="${jdbc.user}"></property>
<property name="password" value="${jdbc.password}"></property>
<property name="initialSize" value="10"></property>
<property name="maxActive" value="16"></property>
</bean>
<bean id="jdbcTemplate" class="org.springframework.jdbc.core.JdbcTemplate">
<property name="dataSource" ref="dataSource"></property>
</bean>
|
C. 测试 spring-test
spring 和 junit 的整合包,可以让测试环境直接在IOC容器中开始,不用每次测试去创建IOC容器
1
2
3
4
5
6
7
8
9
10
11
12
13
14
15
16
17
18
19
20
21
22
23
24
25
26
27
28
29
30
31
32
33
34
35
36
37
38
39
40
41
42
43
44
45
46
47
48
49
50
51
52
53
54
55
56
57
58
59
60
61
62
63
64
65
66
67
68
69
70
71
72
| import com.alibaba.druid.pool.DruidDataSource;
import com.atguigu.pojo.User;
import org.junit.Test;
import org.junit.runner.RunWith;
import org.springframework.beans.factory.annotation.Autowired;
import org.springframework.context.ApplicationContext;
import org.springframework.context.support.ClassPathXmlApplicationContext;
import org.springframework.jdbc.core.BeanPropertyRowMapper;
import org.springframework.jdbc.core.JdbcTemplate;
import org.springframework.test.context.ContextConfiguration;
import org.springframework.test.context.junit4.SpringJUnit4ClassRunner;
import java.sql.SQLException;
import java.util.List;
@RunWith(SpringJUnit4ClassRunner.class)
@ContextConfiguration("classpath:jdbc-application.xml")
public class jdbcTest {
@Autowired
private JdbcTemplate jdbcTemplate;
public jdbcTest() throws SQLException {
ClassPathXmlApplicationContext ioc = new ClassPathXmlApplicationContext("jdbc-application.xml");
DruidDataSource dataSource = ioc.getBean(DruidDataSource.class);
System.out.println(dataSource.getConnection());
}
@Test
public void testInsert() throws SQLException {
ClassPathXmlApplicationContext ioc = new ClassPathXmlApplicationContext("jdbc-application.xml");
DruidDataSource dataSource = ioc.getBean(DruidDataSource.class);
System.out.println(dataSource.getConnection());
String sql = "INSERT INTO user VALUES (null, ?, ?, ?, ?, ?);";
jdbcTemplate.update(sql, "root", "123456", 23, "女", "123@qq.com");
}
@Test
public void testGetUserById(){
String sql = "SELECT * FROM t_user WHERE id = ?";
User user = jdbcTemplate.queryForObject(sql, new BeanPropertyRowMapper<>(User.class), 5);
System.out.println(user);
}
@Test
public void testGetAllUser(){
String sql = "SELECT * FROM user";
List<User> users = jdbcTemplate.query(sql, new BeanPropertyRowMapper<>(User.class));
users.forEach(System.out::println);
}
@Test
public void testGetCount(){
String sql = "SELECT count(*) from user";
Integer integer = jdbcTemplate.queryForObject(sql, Integer.class);
System.out.println(integer);
}
}
|